Tag: cooking

  • Crisp and Juicy Roast Turkey

    Crisp and Juicy Roast Turkey

    a generated image of a roasted turkey sitting on a rack in a roaster pan

    Thanksgiving is right around the corner! That means it’s time to get ready to cook that amazing turkey you’re hoping isn’t as disappointing as last year’s.

    If you’re looking for the traditional Thanksgiving turkey — the one you have to chew 124 times and drown in two quarts of gravy just to make it tolerable — this isn’t the recipe for you.

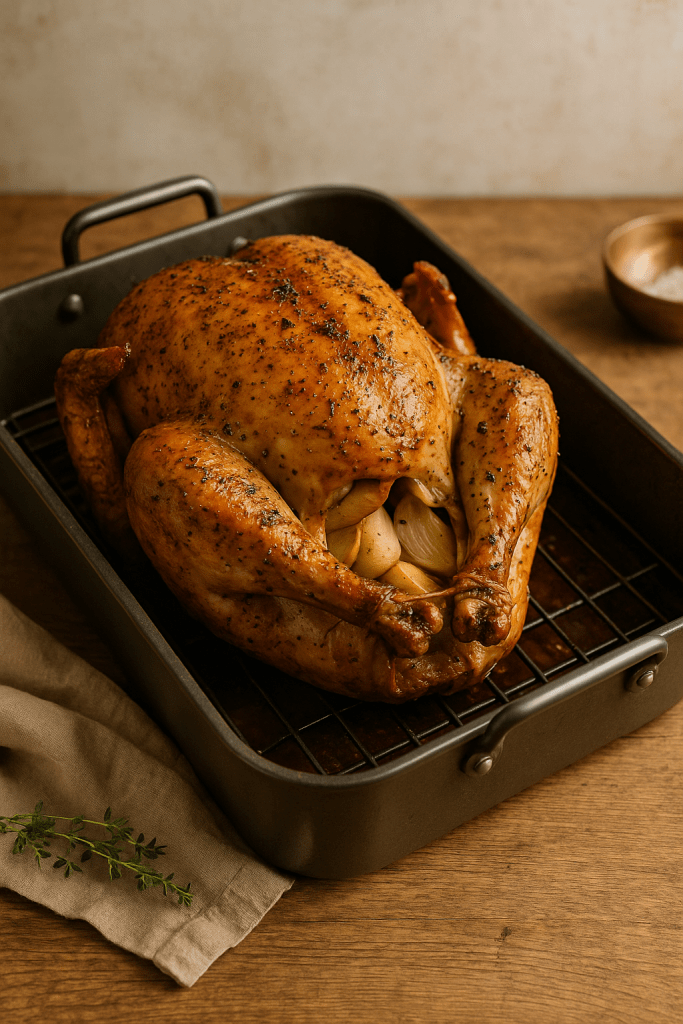
    BUT… if you want the juiciest, most amazing, crispy-skinned, mouthwatering turkey you can imagine, crank up the heat on that oven and slide the big bird in for a shorter, hotter trip to the table than it had last year!

    Serves: 10–12 | Prep: 20 min | Cook: 2½–3 hrs | Rest: 30 min

    🧂 Ingredients

    • 1 whole turkey (12–14 lb), thawed
    • ½ cup salted butter, softened
    • 1 Tbsp olive oil
    • 1 Tbsp salt
    • 1 tsp black pepper
    • 1 tsp paprika
    • 1 tsp garlic powder
    • 1 tsp onion powder
    • 1 tsp dried thyme (or 2 tsp fresh)
    • 1 tsp dried rosemary (or 2 tsp fresh)
    • 1 tsp dried sage (or 2 tsp fresh)
    • 1 onion, quartered
    • 1 lemon, quartered
    • 1 head of garlic, halved crosswise

    🔪 Directions

    1. Prep the bird.
      Remove giblets and neck; pat dry thoroughly. Tuck the wing tips behind the shoulders.
    2. Season.
      Mix butter, olive oil, salt, pepper, and seasonings.
      Rub about half under the skin and the rest over the outside.
    3. Fill the cavity.
      Add onion, lemon, and garlic for aroma (no heavy stuffing—it slows cooking).
    4. Roast hot.
      • Place on a rack in a large roasting pan with 1 cup broth or water in the bottom.
      • Roast at 425 °F for 40 minutes to brown and crisp the skin.
      • Without opening the door, reduce heat to 350 °F and continue roasting about 10–12 minutes per pound, until a thermometer in the thickest part of the thigh registers 165 °F.
      • If skin darkens too fast, tent loosely with foil.
    5. Rest.
      Transfer to a board, cover loosely, and rest 30 minutes before carving.

    💡 Tips

    • For extra moisture, brush once or twice with drippings during the lower-temp phase.
    • Don’t skip the rest period—it’s the secret to juicy slices.
    • Use leftover bones for rich broth later.

  • Bluegill Supper

    Some of y’all might disagree, but nothing tastes quite like fried bluegill that you caught yourself. Especially when it’s pan fried so nicely and combined with foraged Train Wrecker mushrooms and sautéed green beans.

    Tim brought in most of the fish, but Micah managed to land one too.

    I cleaned them the night we caught them while Tim made the marinade for them.

    Once all 10 were ready to go, Tim placed them in the marinade and we put them in the fridge overnight.

    Then, the next afternoon I went looking for mushrooms. We had seen a cluster of them, so I knew where to go.

    Train Wreckers, or Neolentinus lepideus, earned the name by their ability to grow on highly treated railroad ties. If they’re ignored, the tie would eventually disintegrate and could cause a train wreck. Thankfully for us, these mushrooms were growing on a pine root which meant they were safe to eat.

    They do have some look-alikes, some of which are poisonous, so a positive ID is essential before they go in the skillet.

    Fresh green beans were in the fridge just waiting to be used. And so the meal came together.

    The results were delicious and filling. We’re already planning our next fish meal. 😊

  • Best Buttermilk Biscuits

    Best Buttermilk Biscuits

    Hello again!

    Around here, we usually keep breakfasts pretty simple. Bacon and eggs, eggs and bacon, that sort of thing. Sometimes, for variety, we add cottage cheese, veggies, or fruit to the menu.

    And then, other times, we feel like splurging a bit. Usually in those cases, our minds (Tim’s for sure!) turn to biscuits.

    Finding the perfect recipe was a bit of a journey. Especially since we started with store-bought biscuits out of a can. I still shudder sometimes to think of it.

    This recipe is not original to me. I found it online at bakerbettie.com

    The enjoyment we get from eating these flaky rounds of yummyness is ours, though. They are amazing with butter and honey or jam, with Tim’s delicious sausage gravy, or as breakfast sandwiches. Or even reheated with a little butter.

    biscuit bacon egg and cheese sandwiches

    OLD FASHIONED LARD BISCUITS


    Ingredients

    • 2 c Flour
    • 1 T Baking Powder
    • 1/4 t Baking Soda
    • 1 1/4 t Salt
    • 6 T Leaf Lard, cold *
    • 1 c Buttermilk, cold

    Instructions

    Preheat oven to 450 degrees and make sure an oven rack is in the center of the oven.

    Grease a cake pan or cookie sheet or line with parchment paper or a silicone baking mat, if desired. I never grease my pan for biscuits and they seldom stick more than a little bit. If you use a cookie sheet, make sure it has a rim to keep any melted lard from running off.

    Keep lard and buttermilk in the refrigerator until needed.

    In a large mixing bowl, combine the dry ingredients and whisk. *

    flour mixture in a mixer bowl

    Add in the cold lard and cut into the flour mixture using a pastry blender or fork. You want the lard to be mostly in pea-sized pieces with a few larger.

    pieces of butter in flour mixture in a mixer bowl
    butter pieces in flour mixture

    Add the cold buttermilk and stir with a spoon or spatula until just combined. This will not take long and you don’t want to overmix as the biscuits will be tough. The batter/dough will be pretty wet and sticky.

    buttermilk in flour mixture

    Turn the mixture out onto a floured table or countertop. Dust flour over the top. With floured hands, bring the dough into one mass.

    flour on a table

    Pat the dough out and then fold in half. Turn 90 degrees and pat out again. Repeat this 5-6 times. The folds help the biscuits end up flakier.

    patting out biscuit dough

    Press the layered dough out until it’s about an inch thick and use a round cutter that has been dipped in flour to cut the biscuits. Press straight down with the cutter and do not twist. Pat the scraps back together and cut again. Or you can pat the dough into a rectangle and use a sharp knife to divide into 8 biscuits.

    a cut biscuit round
    cutting out biscuits

    Place the biscuits in the prepared pan, making sure the edges are touching to help the biscuits rise.

    unbaked biscuits on a cookie sheet

    Bake for 13-15 minutes until golden brown. Do not open the door for at least the first half of the bake time. Keeping the steam trapped inside the oven helps with the rise.

    golden brown biscuits on a cookie sheet

    Let cool, if possible, and then enjoy however you choose.

    Notes

    * I have substituted butter, tallow, and bacon grease for the lard with no problems. You just want it cold when it goes in.

    *I make mine in my stand mixer and it works just great. Just don’t overmix.